I recently got a Steam Deck, the new handheld gaming system from Valve. So far, it has impressed me. However, I have a bunch of game installation DVDs, but the Steam Deck lacks a DVD drive. I needed to figure out a way to get the DVD contents onto the Steam Deck so I could install a game. One way to get the DVD files onto the Steam Deck is by copying the files from my computer with a DVD drive to the Steam Deck via SSH. However, I noticed that the Steam Deck does not turn on SSH Server (SSHD) by default, meaning I could not connect to it remotely.
SSH stands for Secure Shell Protocol. It allows one to securely remote into their computers from a different computer. With SSH, one can send commands, or even copy files, between 2 computers. OpenSSH is a common SSH implementation that is installed on the Steam Deck by default. However, while the Steam Deck is able to connect to other computers via SSH, it does not allow other computers to connect to it via SSH. This is because the SSH Daemon (SSHD), or SSH Server is disabled by default. From a security perspective, this makes sense. The average user of the Steam Deck is probably never going to remote into it via SSH, so Valve most likely decided to disable it by default so any unfriendly hackers don't try to brute force their way into your Steam Deck and cause problems.
This article will explain how to enable SSHD on your Steam Deck, while also doing it securely. There are multiple ways to go about doing this; this is simply the way I find easiest for me.
Enabling SSHD on the Steam Deck
Enter the Desktop
The first thing you need to do after booting up the Steam Deck is to enter the Desktop. To do this, hit the "Steam" button on the Steam Deck, and scroll down through the menu until you hit the "Power" setting. Then, select the "Switch to Desktop" option.
One the desktop is brought up, click on the Steam Deck logo in the lower-left corner of the desktop to bring up what is essentially the Steam Deck's equivalent of the Windows "Start" menu. On the left column, select the "System" option, and then select "Konsole" on the right column. You can also type in "Konsole" in the search bar.
A terminal will appear. I know, a terminal can be intimidating to anyone who has never used one before. But there's only a handful of commands you need to send to enable SSH. Once the terminal appears, either plug in a Keyboard or hit the "Steam" button + X to bring up the virtual keyboard, and we're ready to start.
Set a Password
The terminal should look something like this:
(deck@steamdeck ~) $
"deck" is the username. The Steam Deck has a default user whose name is "deck". "steamdeck" is your hostname. The hostname you can change (more on that later). If you already changed your hostname, then this may be different.
The first thing you need to do is set a password for the "deck" user. By default, there is no password for the "deck" user to maximum security. With no password, it means a bad actor can't SSH into your Steam Deck, and the deck user can not run commands as root (or as admin, for those more familiar with Windows).
However, we need to run commands as root to enable SSH, so we need a password. To do this, type in the "passwd" command and press enter. It will then ask you for a new password. Then, retype in the same password to confirm. Note, while typing your password, you won't see the characters you are typing show up in the terminal.
(deck@steamdeck ~) $ passwd
New Password:
Retype New Password:
Enable SSHD
Once you have your password set, you need to send one or two commands to enable SSHD, depending on what your goal is.
To enable SSHD, and allow incoming SSH connections, type the following command (you also may get a prompt asking for your password due to running the command with sudo):
sudo systemctl start sshd
"sudo" is a command in Linux that basically says "run the following command as a different user". By default, it will run the command as the "root" user. This is pretty much the equivalent of running a command as an administrator in Windows. "systemctl" talks to software known as systemd. Systemd does a lot of things that I won't go into detail here, but in this case, it is controlling a service or daemon. "start" starts the service, and "sshd" is the name of the service to start.
To stop the SSHD service, the command becomes:
sudo systemctl stop sshd
However, starting the service will only have the service run until the system is rebooted. Now, maybe this is what you want, in which case, you're done. However, if you want SSHD to startup each time the Steam Deck boots, you need to tell systemd to enable the service, and that command is:
sudo systemctl enable sshd
One quick thing to mention, "enable" does not start the service. If you want to both enable and start the service, you'll have to send both the start and enable. Meanwhile, if you no longer require SSHD to start on startup, simply disable it:
sudo systemctl disable sshd
The choice on whether or not to have SSHD enabled on startup is a personal one. One who is security conscious may opt to only start SSHD, do what they need to with it, and then stop SSHD when they are done with it. After all, one can't break into a system via SSH if SSHD isn't even running! I personally do have it enabled on startup, but I have it configured in such a way that makes getting into it difficult (more on that later).
Change the Hostname (optional)
The hostname is a label assigned to a device on a network. When connecting to a device via SSH, usually the hostname is specified (more on this later). By default, the hostname for the Steam Deck is, well, "steamdeck". If you'll only ever have one Steam Deck on your network, you probably don't need to worry about changing the hostname. If you'll have more than one, it may not be a bad idea to consider changing the hostname so you'll always connect to the same device.
The easiest way to change the hostname is exit the desktop to go back to gaming mode, and click on the "Steam" button to bring up the menu. Select "Settings", and then select "System". Scroll down to the "About" section, and you'll see a "Hostname" option. Go ahead and click on the button, and set your Hostname to whatever you want. You'll have to reboot (not just put to sleep) the Steam Deck in order for the hostname to change.
Installing an SSH Client
Now that your Steam Deck is now running SSHD, it can now accept incoming SSH connections from other PCs. However, those other PCs need an SSH client installed in order to connect to the Steam Deck. There are several SSH clients out there.
Windows
PuTTY is a popular SSH Client that has been around for years, and works on many versions of Windows. You can install it via the following ways:
- Download it from PuTTY's website here: https://www.chiark.greenend.org.uk/~sgtatham/putty/latest.html
- Install it via the Microsoft Store here: https://apps.microsoft.com/store/detail/putty/XPFNZKSKLBP7RJ
- Install it via Chocolatey via the putty.install package.
However, if you have a modern version of Windows 10, consider, instead, installing OpenSSH, as this is the same piece of software the Steam Deck uses, just built for Windows. Microsoft has instructions on how to do that here, but here's a recap.
- Hit "Start" and type "Settings" and hit the Enter key.
- Click on "Apps" and select "Apps and Features" on the left column.
- Click on "Optional Features"
- In the search bar, search for "OpenSSH" and select "OpenSSH Client" and hit "Install".
To verify OpenSSH was installed successfully, hit Start and type "PowerShell" and hit enter. A terminal will show up. Type "ssh" and hit enter in the terminal, and you should see a usage print out that looks like this:
usage: ssh [-46AaCfGgKkMNnqsTtVvXxYy] [-B bind_interface]
           [-b bind_address] [-c cipher_spec] [-D [bind_address:]port]
           [-E log_file] [-e escape_char] [-F configfile] [-I pkcs11]
           [-i identity_file] [-J [user@]host[:port]] [-L address]
           [-l login_name] [-m mac_spec] [-O ctl_cmd] [-o option] [-p port]
           [-Q query_option] [-R address] [-S ctl_path] [-W host:port]
           [-w local_tun[:remote_tun]] destination [command]
Linux
Most Linux distributions come with an SSH client installed by default (usually OpenSSH). To see if its already installed, open a terminal and send "ssh", and you should see the usage output:
usage: ssh [-46AaCfGgKkMNnqsTtVvXxYy] [-B bind_interface]
           [-b bind_address] [-c cipher_spec] [-D [bind_address:]port]
           [-E log_file] [-e escape_char] [-F configfile] [-I pkcs11]
           [-i identity_file] [-J [user@]host[:port]] [-L address]
           [-l login_name] [-m mac_spec] [-O ctl_cmd] [-o option] [-p port]
           [-Q query_option] [-R address] [-S ctl_path] [-W host:port]
           [-w local_tun[:remote_tun]] destination [command]
If you do not have SSH installed, you can install it via your package manager:
# Ubuntu / Debian
sudo apt install openssh-client

# Arch Linux
sudo pacman -S openssh
PuTTY is also available for Linux as well. You can install it from your package manager if you prefer PuTTY over OpenSSH:
# Ubuntu / Debian
sudo apt install putty

# Arch Linux
sudo pacman -S putty
Connecting to the Steam Deck
Now that you have an SSH client installed, you can try connecting to the Steam Deck via SSH. One thing to double check is to make sure is both your Steam Deck and your computer you want to use to connect to it are on the same network. If they are not, you'll never be able to have them talk to each other (well, at least not easily).
PuTTY
To connect via PuTTY, go ahead and start PuTTY. A window will appear. You'll want to select the "SSH" radio button, if its not already selected. In the "Host Name (or IP address)" text box, you'll want to put in "deck@steamdeck". This tells PuTTY to login as the "deck" user to the device on the network labeled "steamdeck". If you changed hostnames, replace "steamdeck" with your hostname. If you changed your default SSH port (more on that later), you'll have to replace 22 in the port text box with that. Then click "Open".
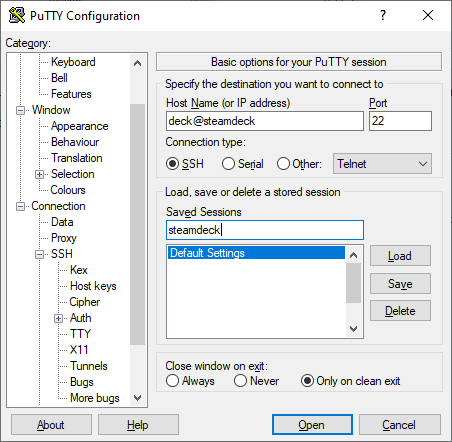
A black Window should appear with a terminal that looks like:
(deck@steamdeck ~) $
If you see that, congratulations! You can now SSH into your Steam Deck!
OpenSSH
If connecting via OpenSSH, open PowerShell if on Windows, or your favorite terminal if on Linux. Then, simply send the command:
ssh deck@steamdeck
If you changed hostnames, replace "steamdeck" with your hostname. If you changed your default SSH port (more on that later), you'll have to add an additional argument (the example below has the port changed to port 1000):
ssh deck@steamdeck -p 1000
Securing your Steam Deck
Being able to SSH into your Steam Deck can be connivent for a variety of reasons, but it does come at a risk that someone could brute force their way into your Steam Deck and cause havoc. If you'll never connect to a public or untrusted network, you probably do not have to worry about any of this. However, if you do plan on doing so, you should consider securing your SSH server so bad actors can't get into your Steam Deck.
The most secure way to ensure someone can't SSH into your Steam Deck is to turn off SSHD when you're not using it. However, for those who want to keep SSHD running at all times, here are some tips you can use to prevent unauthorized access to your Steam Deck.
Changing the Port
Changing the default port SSHD listens for connections on (port 22) can help prevent novice hackers from brute forcing their way into an SSH connection since they may not be experienced enough to check for other ports. However, any experienced hacker is smart enough to run a port scan and figure out which ports are running SSHD. Changing the default SSHD port could be considered "Security through Obscurity", where keeping a secret (being the port number in this case) is the main method of providing security. I personally don't bother changing the default SSH port for this reason, but for those who are interested, here's how to do it.
You'll need to open a terminal on your Steam Deck, either by SSHing into it with another PC, or by doing it on the deck itself. If doing it on the deck itself, consider grabbing an external keyboard, since the built-in on-screen keyboard does not have a CTRL button. Then run the command:
sudo nano /etc/ssh/sshd_config
"nano" is a text editor built into the terminal. Vim and Emacs are also popular choices, but nano is probably the easiest to use. /etc/ssh/sshd_config is a file that is the SSH Daemon configuration. Towards the top, you should see something like this:
#Port 22
#AddressFamily any
#ListenAddress 0.0.0.0
#ListenAddress ::
The '#' characters represent comments, which means the lines are ignored. If you want to change your port to, say, port 9001, you'll have to edit the config file so it looks something like this:
Port 9001
#AddressFamily any
#ListenAddress 0.0.0.0
#ListenAddress ::
Deleting the '#' character tells SSHD to no longer ignore the line, and the next time it starts, listen for incoming SSH connections on port 9001. This means that when connecting to the Steam Deck from your other computer, you need to specify the port:
ssh deck@steamdeck -p 9001
To save the configuration hit CTRL+O (Write Out), and then hit CTRL+X to exit.
Changes to SSHD are not applied until the process is restart. To do that, run the following command on the Steam Deck:
sudo systemctl restart sshd
Disable Root Login
The "root" user on Linux is all-knowing. It has access to everything on the system. If a hacker gets access to the root login on a system, they can do whatever they want. Therefore, its important to make sure getting access to the root user is as difficult as possible.
By default, SSHD does not allow someone to login as the root user via SSH with a password. You can confirm this by checking the SSHD config by running the following command on the Steam Deck:
sudo nano /etc/ssh/sshd_config
Arrow down, and you should see something like this:
# Authentication:

#LoginGraceTime 2m
#PermitRootLogin prohibit-password
#StrictModes yes
#MaxAuthTries 6
#MaxSessions 10
If you see this, it means the only way someone to login as root is via an SSH key (more on that later). If you want to make it so no one can login as root period, change the setting to look like this:
# Authentication:

#LoginGraceTime 2m
PermitRootLogin no
#StrictModes yes
#MaxAuthTries 6
#MaxSessions 10
Remove the '#' in front of PermitRootLogin tells SSHD to no longer ignore that setting, and the "no" says "never allow anyone to login directly as root via SSH". Hit CTRL+O to save the config, and CTRL+X to exit nano. Then, restart the SSHD service by sending the following command:
sudo systemctl restart sshd
Using Key-based Login
The most effective way to ensure no one can get into your Steam Deck via SSH is to disable password-based login. This means that a hacker can't brute force their way into your system by guessing passwords. Rather, the way into the Steam Deck via SSH is with a key. While a strong password gives a lot of protection, brute forcing a key is pretty much impossible, and is connivent since you no longer need to specify a password.
An SSH Key is composed of two parts, a private key and a public key. The private key stays on your SSH client and should never, ever, be given out to anyone. A public key, meanwhile, gets added to SSH Servers saying "the user who has this key is allowed in". For more information about "Public-key Cryptography" see this Wikipedia article.
Generating an SSH Key
The first step to using SSH keys is to generate one. Each client does their own thing, so here are instructions for both. This is NOT done on the Steam Deck, but rather the computer you'll be using to connect to it.
PuTTY
When PuTTY is installed, it installs a tool called PuTTYGen (PuTTY Key Generator). Launch this tool (if on Windows, hit Start and type "PuTTYGen"). On the Window that appears, ensure RSA is selected at the bottom (should be RSA by default), and then hit the "Generate" button. PuTTY Gen will ask you to move your mouse over the blank area to "generate randomness". Once that's done, you should see a window like below. For the "Key comment", I usually put my computer's login name @ the hostname. So, me@mycomputer.
If you trust that your device will only ever be used by you, you probably do not need to enter a passphrase here. The only thing a passphrase does is make it so if someone gains access to your PC and copies your private key, they won't be able to use it. If there is no passphrase, and someone steals your private key, then they'll be able to use it. If this is a concern, add a passphrase, otherwise leave it blank.
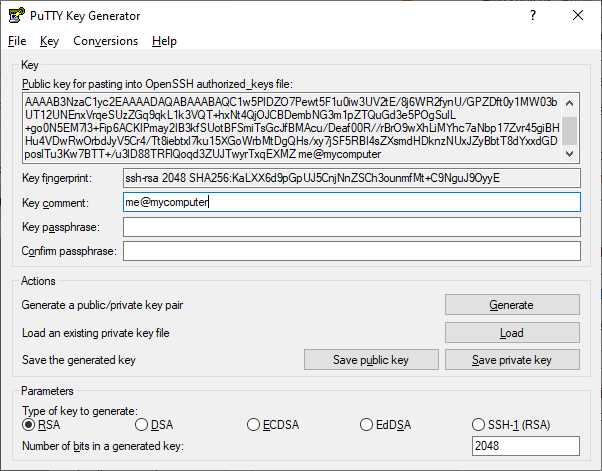
Go ahead and hit "Save private key" and save the .ppk file somewhere safe. I usually put it in C:\Users\Me\.ssh\key.ppk on Windows, but you can put it wherever you want, assuming its a spot only you have access to. You can also optionally hit "Save public key" and save that somewhere as well. I usually put it in C:\Users\Me\.ssh\key.pub on Windows.
Before you close out of PuTTYGen, copy the entire contents of the text box that says "Public key for pasting into OpenSSH authorized_keys file:". This is your public key in a format OpenSSH will use, and we'll need that later.
OpenSSH
If you're using OpenSSH, generating an SSH Key is a bit more straightforward. Open PowerShell on Windows or your favorite terminal on Linux, and run the following command:
ssh-keygen
You'll then be prompted on where to save the public and private key. By default, the generated private keys will be saved to C:\Users\You\.ssh\id_rsa on Windows, or /home/you/.ssh/id_rsa on Linux. The public keys, meanwhile, will be saved to C:\Users\You\.ssh\id_rsa.pub on Windows, or /home/you/.ssh/id_rsa.pub on Linux by default. If these default values are fine with you, just hit enter at these prompts without entering anything. When it asks you for a passphrase for your key, you can also leave that blank if you want. If you trust that your device will only ever be used by you, you probably do not need to enter a passphrase here. The only thing a passphrase does is make it so if someone gains access to your PC and copies your private key, they won't be able to use it. If there is no passphrase, and someone steals your private key, then they'll be able to use it. If this is a concern, add a passphrase, otherwise leave it blank.
After creating your private/public key, send the following command to get the contents of your public key:
# Windows Powershell
cat c:\\Users\\You\\.ssh\\id_rsa.pub

# Linux
cat /home/you/.ssh/id_rsa.pub
"cat" stands for "concatenate". While it can be used to stitch multiple files together, it can also be used to dump the contents of a file to the terminal.
Copy the output, we'll have to paste it in later.
Adding the Public Key to SSHD
Once you have your public key copied to your clipboard, SSH into your Steam Deck. Then, run the following commands in the SSH terminal:
cd
mkdir -p .ssh
nano .ssh/authorized_keys
"cd" stands for "Change Directory". Sending "cd" by itself brings you to your home directory. "mkdir" stands for "Make Directory", and the "-p" argument stands for "don't error if the directory already exists". .ssh" is the directory to create. This command says "create a .ssh folder in my home directory if one doesn't already exist". nano is a text editor, and it opens an authorized_keys file.
The authorized_keys file contains one public key per line. The only thing you need to do is paste in your public key that you copied in the last step. If in PuTTY, you just need to right click to paste. If in OpenSSH, it depends on your terminal on how to paste. Once your key is pasted in, hit CTRL+O to write the file, and then CTRL+X to exit nano. If you want to add more public keys, simply paste it onto a new line. If you want to revoke a key later, delete the entire line.
Connecting with an SSH Key
Before disabling password-based login, we should make sure you are actually able to login via your SSH Key instead of a password.
PuTTY
With PuTTY, setup everything the way you normally would, but there's one additional step. On the left-most column, expand the tree, and click on Connection -> SSH -> Auth. There, you'll see a "Private key file used for authentication" text box. Hit "Browse" and select the private key (.ppk) file you generated earlier. You can optionally hit the "Session" at the top of the tree on the left and save your settings for next time.

Hit "Open", and it PuTTY does not ask you for a password, you successfully logged in via an SSH Key!
OpenSSH
For OpenSSH, its actually pretty easy to do. If you saved your private key to the default location, you just need to send the usual SSH command:
ssh deck@steamdeck
If you saved the private key somewhere else, you'll have to specify that via the -i argument (i standing for "identity_file"):
ssh -i /path/to/private/key deck@steamdeck
If SSH does not prompt you to enter a password, you logged in via a key! If not, double check your authorized_keys file on your deck, and make sure the key got pasted in correctly.
Disabling Password Login
The last thing to do is to actually disable password login if you want. It is important to make sure you were able to successfully login into your Steam Deck from another computer via an SSH key before proceeding, otherwise, without and SSH Key, you'll never be able to login without editing the SSHD config directly on the Steam Deck.
Open the SSHD config with the following command:
sudo nano /etc/ssh/sshd_config
Arrow down and you should see something that looks like:
# To disable tunneled clear text passwords, change to no here!
#PasswordAuthentication yes
#PermitEmptyPasswords no
By default, password authentication is enabled. To disable it, Remove the '#' in front of "PasswordAuthentication" to tell SSHD to no longer ignore this setting, and set "yes" to "no". It should look something like:
# To disable tunneled clear text passwords, change to no here!
PasswordAuthentication no
#PermitEmptyPasswords no
Hit CTRL+O to save the settings, and then CTRL+X to exit. Then restart the SSH service by running:
sudo systemctl restart sshd
One that's done, no one will be able to login to your Steam Deck via SSH without your private key!
Conclusion
SSH is a useful utility, and has many uses. Having it run on a system is extremely connivent. However, it should be done so securely. Hopefully these instructions allow you to make the most use of your Steam Deck!
